1 May 2016

How to make copers


Another of my #DIY posts!

One day out skating, a friendly skateboarder asked me why I don't do truck grinds. I explained that even trying grind down the king pins, they still stick out. He had a look at my trucks and said get copers! So simple solution, why hadn't I thought about it before!? If I can't get the kingpins lower, I should just rise the truck... and with the coper it would be slidier! At home I googled 'copers' to see what they look like and then headed off to a hardware store....

Coper installed

Materials & Tools 

  • One length of plastic plumbing pipe (pvc pipe) about 25mm diameter (check your trucks for size!) and with walls thick enough (2-3 mm). I took one truck with me when I went shopping, just to make sure.
  • Hacksaw 
  • Sharp drill (useful but not necessary) 
  • Vice (useful but not necessary) 
Material and tools
Select pipe with thick walls

Steps 

1. Cut pipe to length - slightly shorter than your trucks.
2. Draw a line lengthwise Draw the little cut out in the middle (to accommodate your kingpin assembly)
 (optional but makes things easier: drill three holes to take most of the material off middle of the pipe)
3. Saw the pipe open lengthwise
4. Saw off the middle 'cut out' section. If you'd drilled it already, there won't be much to saw, so just tidy it up.
5. REPEAT three more times until you have four copers

DONE!
Drill 3 holes in the middle, cut lengthwise then cute the middle section out
Now you can fit them by simply snapping them on. The pipe is flexible enough to open up to snap them on, but retains it's shape well and will hold on nicely.
Snap on, snap off!

17 August 2015

Skate build III (and how to make improved sliders)


My Nike trainer skates were nice but as you can see, I have gone and swapped the boot to a ice hockey boot. I got too precious about my toenails and tired of bruised ankles and lower shins, so decided to go for a hard boot. I got these ice hockey skates from a junk shop in Finland for 2 euros (you get four pints of milk for that money). I pried off the blades and was left with a nice sturdy boot, made in Czechoslovakia. They were old but comfy. I later on swapped them to another pair of hockey boots (Bauer Rocket Vapor, 6,50 euro) as this pair turned out to be too small after all. 
You will see that I improved the design of the sliders too because they broke (as some of you had suspected might happen!). I am happy that I solved the pivot cup problem as well. 

The boot - and old ice hockey boot with the blade ripped off

The centre line - I noted where the blade had been installed so the centre line was easy to find

I noted that the blade was higher at the back and so I would need to add a heel to the build. I used some of the left over chopping board to make heel shapes.

I used Ikea chopping board (cost 80 pence) and an electric jigsaw, using a slim blade. The nylon plastic cuts very nicely.

It was loud so popped on ear defenders!

The heel risers all cut and shaped up with a file. The material is a pleasure to file. Very easy to shape.
Testing the mount with large amounts of tape. More details of this fast (and rough but good enough for me!) method here: http://theblizzard54.blogspot.co.uk/2015/05/centering-plates.html

Holes drilled, bolts tightened, plates fitted! These were fairly easy to drill and fit as the tongue is wide and comes down very near the toe box. My Nike trainers were a pain to mount compared to these - easy and pleasant!

The painful bit. The pivot cups... I took a long while to figure out how to get them right. I tried various things but this is the answer (I think.... so far so good...) The Penny trucks' pivot rod is slightly thicker and shorter than the standard Probe truck that goes with these plates. It is also in a slightly, very slightly, different angle. I fixed this but drilling these hard pivot cups with 9mm drill at a slight angle. Now the pivot rod sits in them nicely and should not pop out (as it did a couple of times before)! 

So this is what went wrong with my previous design for the sliders. The angle was too sharp and created a weak spot. The previous post is here: http://theblizzard54.blogspot.co.uk/2015/06/how-to-make-sliders-for-probe.html Check it out for further details regarding the installation,

I designed a new, improved shape, eliminating any sharp bends that would create weaknesses, and returned to the originals shape I used for my Bonts with Arius plate. See post here: http://theblizzard54.blogspot.co.uk/2015/02/how-to-make-sliders-for-arius.html 

For interest: The original shape I came up with - very strong.
New shape - just fits. I made it as wide as I could without it touching the trucks. I used the original holes I had drilled for the earlier slider design. 

Rough shape cut with a jigsaw, ready to be filed into the final shape.
Final shaping with a file.
I added wooden blocks to go between the plastic sliders to add rigidity and eliminate any movement that could weaken the plastic.
  
Sliders fitted with M5 40mm bolts - just right length to go through.
Then I popped the little square wooden block between the sliders to give it some rigidity, and drilled through.

Final bolt in place through the sliders. Nice!
Ta-dah! Skates in action! (Yep I swapped the boot once more, and changed the wheels, otherwise the same.)
In action! 
Here they are :) 

1 June 2015

How to make sliders for Probe

NOTE - I have made some improvements to the slider design - check my newer post! Different shape, same installation. 
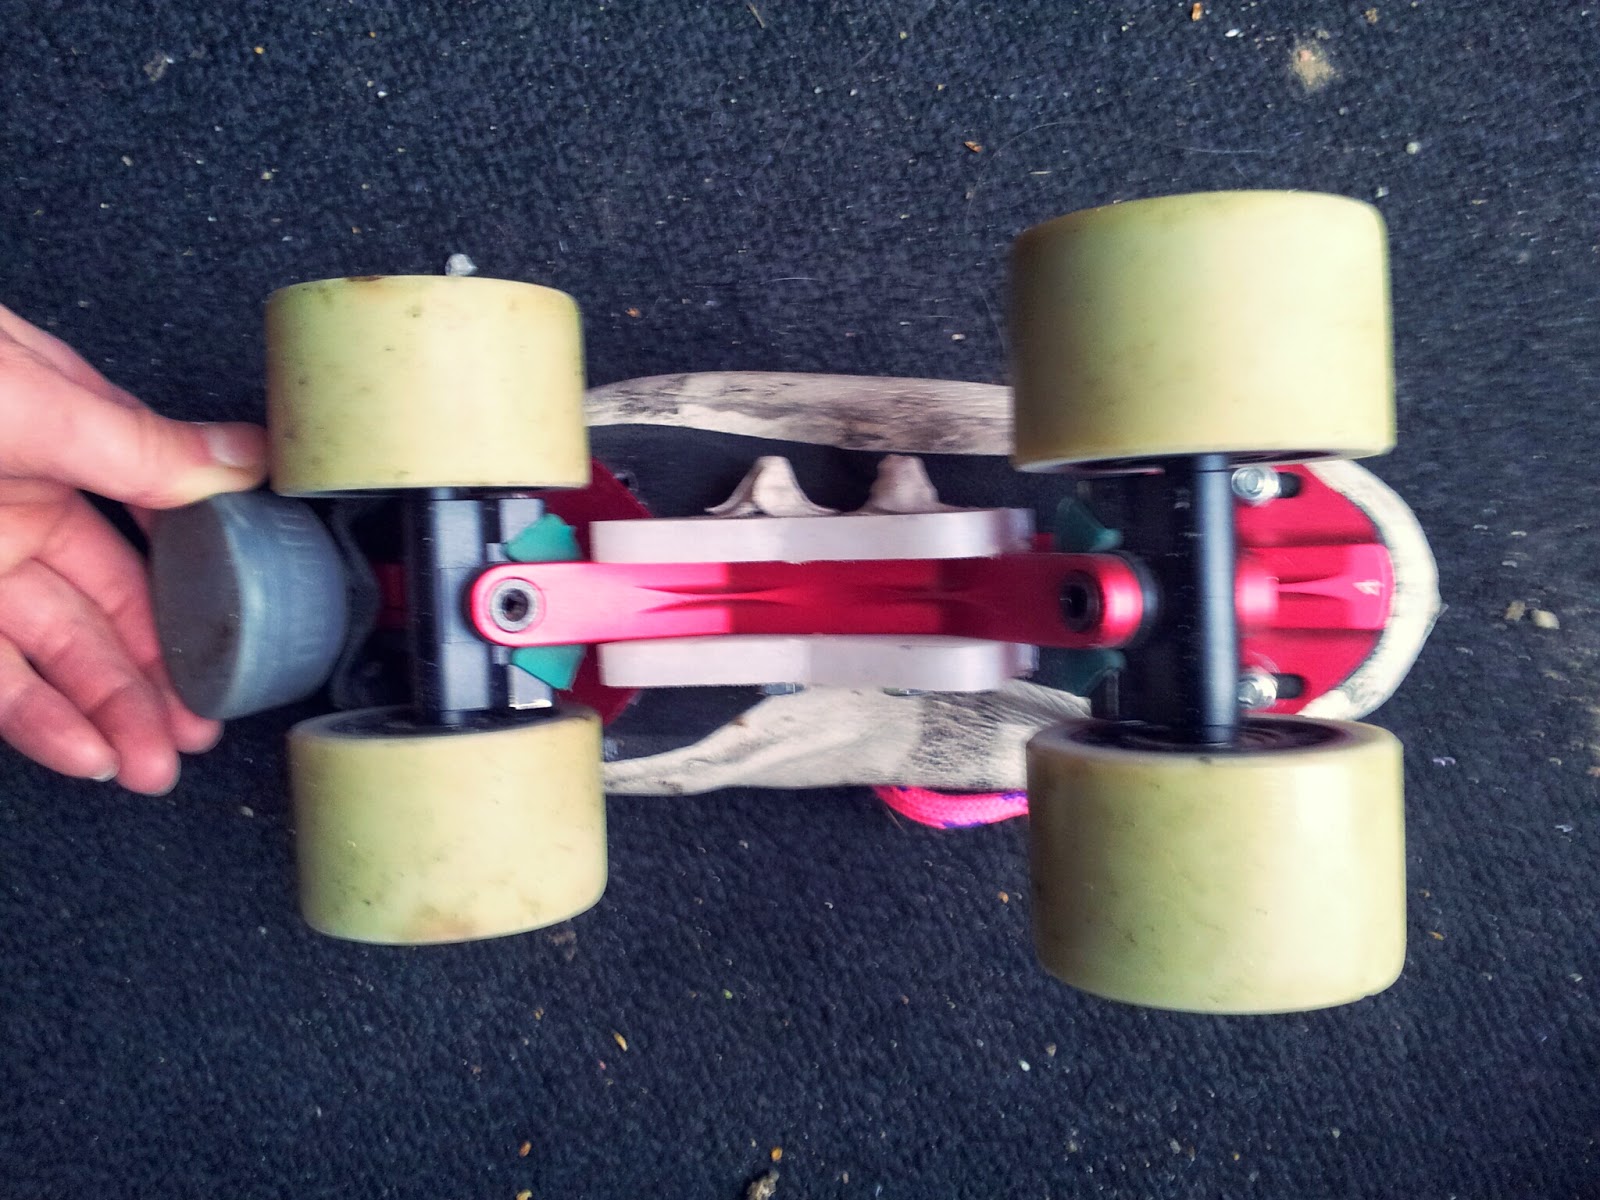
Following my post about how to make sliders for Arius plate, I have built myself ramp skates using the Sure-Grip Probe nylon plate and fitted them with DIY sliders. Here is how...

Materials and tools

  • Card for making the template
  • Pen & scissors
  • Plastic chopping board (mine from Ikea, 80p)
  • Electric jigsaw and a narrow blade for cutting curves
  • 10mm drill bit (optional, for easier cutting of the plastic)
  • Clamps for holding the plactic as you saw it
  • Vice (optional, for easier final shaping of the slider pieces)
  • Rough half rounded file for finishing the shaping
  • 5mm drill bit and a cordless drill
  • Four bolts and nuts to fit the 5mm holes (nuts with nylon inserts, just like skate wheel nuts)
  • Spanner(s)/socket & ratchet to tighten the nuts

How to

Cut a template out of card. Make it as big as you can, without it touching the skate parts when they move. Try to make the shape symmetrical. Mine has a wide base so that more of it presses against the plate for stability. The height I chose so that they sit lower than the axles which I aim to be grinding on.


Once happy with the template, draw four shapes on the chopping board. Place them so that they are easy to cut.


Drill 10mm holes in any sharp corners of the shapes. This leaves only straights to cut, making the job easier. 


Clamp the plastic onto the work surface and make sure it's securely held in place before starting the cutting.
Use the jigsaw to cut off each shape. Don't worry about making the tidiest cut as you can easily shape them up later.


Gather all four pieces and clamp them together, making sure the bottoms sit flat. Put them on a vice if you have one. Then grab your rough file and shape them even.


Take them off the vice. Adore your handiwork for a minute. Nice job! 

Place one on the skate plate where you want it. Carefully check it's in the right place. This is the scariest irreversible bit - drilling the holes. Drill the holes as far apart as possible where the nylon is the thickest, but not too close to the kingpin.(No pictures as I was concentrating so hard on the task!)

If you can't hold both slider pieces in place securely while you drill, do what I did. While holding the top slider in place, drill through it until you hit the nylon and leave a mark on it. Don't drill through yet. Then take the slider off and drill through that mark on the nylon, making sure that you hold the drill square in all directions. Then replace the slider, drop a bolt through the hole to hold it in place as you drill the other hole all the way through. 


Slot a bolt in the other hole too, fix the both nuts in place and tighten them with the spanner and ratchet. Make sure that they feel solid.


Inspect your work and do any required final shaping with the rough file. Do the same to the other skate and you're done!


Nice! 

28 February 2015

How to make sliders for Arius

I am skatepark mad and whilst building proper ramp skates, I have been skating with my dear old derby skates. Looking at the plate (Powerdyne Arius size 4), I thought that I could easily fix some plastic on it to help to protect the plate and get me grinding. This is what the plate looks like without the sliders. Handy holes there for fixing the sliders on.


I tested them at the park quickly today (it started to rain) and they feel OK, although I only got to test them for stalls. I will report back once I have tested them properly for grinds! I haven't done any grinding before as I haven't had grinders so it's going to be interesting, ha ha.
Powerdyne Arius plate

How to make the sliders/grinders (grind blocks) for Arius plate

  1. Buy a chopping board (cost 80p)
  2. Cut a slider template from cardboard
  3. Trace 4 shapes on the chopping board using the template
  4. Cut the shapes (an electric jig saw works fine)
  5. Clamp the cut shapes together and sand them even (electric sander is useful!)
  6. Mark the holes on a shape
  7. Clamp two shapes together and drill through both
  8. Get two bolts, nuts and four washers - and fix the shapes on the plate!
I took about 40 minutes to make these. The chopping board plastic cuts very nicely and does not melt when sawn but goes powdery. 


I made the shape with a shallow V, but they could be made any shape. They feel really solid. There is not much space on the plate for them to sit on, but I hope it's enough.


There is a wide enough gap and the chopping board is think enough to give some sliding surface. 


14 January 2015

Sneaky nasty muscle imbalance

I went to see a physio last week. Her judgement after a couple of tests: You have weak abs. Your inner core is not working.

What!? But I can plank 3 minutes, what is this?

I'd had my suspicions after struggling with the special sit-ups that were part our roller derby fitness test. Then I recalled a pilates session where all the old ladies were rolling up and I just could not. There was a picture that I'd spotted on Google, weak abs going with weak glutes. Yes, the previous physio judgement had been weak glutes... and hamstrings.
My body didn't know about the muscles.
Obliques ...and what else is there?
I started roller derby some 4 and half years ago, having not been very active for years. My body started using the muscles that it knew about - quads and external obliques. Only now I know that my body wasn't firing up my glutes, hamstrings or inner core. They'd got so lazy from all the sitting down and my body had forgotten how to use them.

Through training my quads and obliques got stronger and stronger.

They started compensating for the lazy muscles which got weaker.

I mastered 3 minute plank, not knowing that in fact it was the massive obliques doing the job... I've got nice core strenght! Actually, no. It was an illusion. Stupid body!

Piece of advice to all new to derby


On hindsight, I should have told myself 4 years ago: 
You have started a sport. Get conditioning, get your body better as whole. Stretch to get more flexible and to stop your body being pulled into a twist by tight muscles. Make sure all your muscles are firing up! Strength train rather than letting your sport to train your muscles - you'll end up all wonky. Physios offer muscle strength tests, which would not be a bad idea to do at an early stage.
If I went to gym, I would not just train one action. I did not realise this when I started derby. I'd be just skating.
Crossed pelvic syndrome
It did not help that my other activities favoured the same muscles - cycling and sitting.

Only when I started getting problems with my hips this 'whole body' thing has started opening up to me.
  •  poor balance because of inner core is not helping me
  •  muscle cramps from overuse and resulted tightness
  •  supertight hipflexors - weakness and tightness producing poor posture
  •  not using what's supposed to be the biggest & strongest muscle, glutes
  •  hip pain, slowly worsening 
A big thank you to all the physios I have seen, now I have a way to start patching myself up:
  •  Stretching, stretching, especially hipflexors and quads
  • activating lower abs, just contracting them a little, reminding my body they are there
  •  telling my glutes to work when doing squats, doing bum-squeezes as activation exercise
  •  fully appreciating the benefits of pilates, yoga and all those gentle balance & body control exercises 
  • foamrolling, massage, sitting on tennisballs (quite nice!)


 further reading - http://www.jandaapproach.com/about/

4 September 2013

Team Finland try-outs

The progress and the skill! What else can I say of the quality of the try-outees for Team Finland world cup team 2014? The selection panel is going to have a tough job. I

Pre-selection for the try-outs was done based on mainly experience. Got me counting how many bouts I have played within my two-and-half-year (30 months) bouting career. Throw a guess and then scroll down for the answer*! I spent a way too long writing an essay as to why I want to be in the team. It's not very Finnish to sing your own praises. That considering, I think I did well, ha ha...

For the weekend 31.8-1.9.2013 I flew over to Helsinki for the try-out weekend. I did not feel nervous, but rather concentrated and quiet. I tried hard - yes, that *is* an acceptable reason for the numerous times I found myself on the floor or the penalty box. It was fun. We played three scrimmages and watched a few others. We worked nicely as a team. Speaking derby in Finnish was not as strange as I'd feared. I did not get tired. It was over quicker than anyone wanted (or me at least).

I did derby stops
punkmarko.kuvat.fi
There were about 60 of us. 41 made it through to the second day of the try-outs after a day of skills demonstrations (forward and backward skating, one-sided ploughs, derby stops, hockey stops, blocking, jamming) and a few scrimmages. I was very happy to be one of them. Now I just have to wait and see if I am on the list of skaters they decide to develop into a team (two weeks' wait!). Even that list won't guarantee a world cup place as we were told the final team will form/evolve within a year or so. Exciting! Competitive! 


*howmanyboutsthirtyseven